


Calendar
July 2026 M T W T F S S 1 2 3 4 5 6 7 8 9 10 11 12 13 14 15 16 17 18 19 20 21 22 23 24 25 26 27 28 29 30 31 -
Recent Posts
Archives
- January 2024
- October 2023
- September 2023
- July 2023
- June 2023
- April 2023
- October 2022
- September 2022
- April 2022
- March 2022
- February 2022
- December 2021
- November 2021
- August 2021
- June 2021
- May 2021
- April 2021
- March 2021
- February 2021
- January 2021
- December 2020
- October 2020
- September 2020
- August 2020
- July 2020
- June 2020
- October 2019
- September 2019
- August 2019
- June 2019
- May 2019
- March 2019
- February 2019
- December 2018
- November 2018
- October 2018
- September 2018
- August 2018
- July 2018
- June 2018
- May 2018
- April 2018
- March 2018
- February 2018
- January 2018
- December 2017
- November 2017
- October 2017
- September 2017
- January 2017
- October 2016
- September 2016
- August 2016
- July 2016
- June 2016
- May 2016
- April 2016
- March 2016
- February 2016
- December 2015
- November 2015
- September 2015
- August 2015
- July 2015
- June 2015
- May 2015
- April 2015
- March 2015
- February 2015
- January 2015
- November 2014
- August 2014
- August 2013
- July 2013
- June 2013
- March 2013
- February 2013
- November 2012
- October 2012
- August 2012
- July 2012
- June 2012
- May 2012
- April 2012
- March 2012
- February 2012
- January 2012
- December 2011
- November 2011
- October 2011
- August 2011
- July 2011
- June 2011
- April 2011
Categories
- Bathroom Cleaning
- Bedroom Cleaning
- Carpet Cleaning
- Cleaning Products
- Cleaning Service
- Cleaning Service Clearwater
- Cleaning Service Tampa
- Cleaning Tips
- Clearwater
- Condominium Cleaning
- Finest European Maids
- Floor Cleaning
- Green cleaning
- Holidays
- Home Cleaning
- Home Organizing
- House Cleaning
- Kitchen
- Living Room
- Maid Service
- Maid Service Tampa
- Moving
- Office Cleaning
- Palm Harbor
- Pinellas County
- Press Release
- Projects
- Residential Cleaning
- Spring Cleaning
- St. Petersburg
- Summer cleaning
- Tile Cleaning
- Tips
- Uncategorized
- Vacation Condominium
- Vacation Rental
- Windows Cleaning
Cleaning Service
Making Sense of “Bedroom Hygiene”
 Cleaning your bedroom (thoroughly) the right way is a chore that is often overlooked and avoided.
Unfortunately, not properly cleaning your bedroom, specifically in the areas of your bed, pillows, and sheets can cause unwanted dirt, negative skin reactions, bacteria, and even illnesses. Below are a few outlined steps to more effectively cleaning your bedroom, as well as details explaining how often each should be done and on what timely basis.
Cleaning Your Bed
Most people look past this chore, or procrastinate and often this behavior leads to unwanted acne, breakouts, and even ticks, fleas, and dust mites. Cleaning your bed, including sheets, pillow cases, and even the mattress itself is essential to preventing unwanted germs and hosts of other illnesses.
An uncleaned mattress also collects dust and allergens, in turn setting off allergies that you may not have even knew you had!
Realistically, you should change and clean your sheets weekly, and be sanitizing and changing (flipping) your mattress every month if possible. You need to remove all items first, before attempting to clean your mattress, but it’s as simple as sprinkling baking soda, using a light cleaner with a sponge, and then airing your mattress out, outside to collect UV rays from the sun to both dry your mattress and kill unwanted germs and other bacteria.
Vacuuming in and around your bed
If possible, it’s recommended that you lightly vacuum your mattress, as well as areas around your bed on a monthly basis. This is important, since often you cannot see dusts, allergens, dirt, and other skin oils with your bare eyes that are both unhealthy for your body and poor for your sleeping conditions.
Before ‘getting down and dirty’ with your bed, linens, and the surrounding areas it’s especially important to make sure you clear all objects on, in, and around your bed so that you do not miss any dust or pollen, and so that dirt does not spread or cling onto other objects during the cleaning process!
Cleaning your Linens the Right Way
If you are not cleaning your sheets, pillow covers, and even your pillows themselves the right ways, you could be missing germs and unwanted dust and dirt.
Each fabric for the corresponding bed linens should have their own directions somewhere on a label directing you as to what type of washer and dryer settings you should use to clean them, such as temperature for example, and what will be the safest method so that you do not destroy your linens in the process.
Image credit: Wong Wai Kit
Posted in Bedroom Cleaning, Cleaning Service, Home Cleaning, House Cleaning, Tips
Comments Off on Making Sense of “Bedroom Hygiene”
Providing Home Cleaning Service in Clearwater FL
Home Cleaning service by European Maids Cleaning company of St. Petersburg FL.
We have been providing home clearing service in Clearwater for over 20 yeas. We Guarantee 100% satisfaction. Call for your FREE Estimate Today!
Our cleaning crew has done a great job cleaning 2/2 house in Clearwater FL.


Posted in Cleaning Service, Clearwater, Home Cleaning, House Cleaning
Comments Off on Providing Home Cleaning Service in Clearwater FL
Cleaning The Home The Green DIY Way
 If you’re a person who is not only environmentally conscientious, but also one who likes to Do It Yourself or DIY, there are ways to keep your home clean using your own products made from regular things around the house.
First of all you’ll be tackling the two tough rooms. The kitchen and the bathroom. If you have kids and there’s a room designated for play, that can be a major challenge too. Pets add additional wear and tear so you’ll need a cleaner that can really get in there and pull up that grime and disinfect.
Believe it or not, good old fashioned vinegar and water can get you a long way. Add some eco friendly soap and you’ll be in business. Even baking soda comes in handy and in the right combinations will do the job as good as if ot better than the higher priced store bought items.
Vinegar, water, and eco friendly liquid soap is great for the kitchen. With a spray bottle, bucket and mop, you’ll do dirt so much damage that your head will spin. You can clean tile, wood, metal, plastic, and other kitchen surfaces and cause no harm. A clean cloth or microfiber cloth and you’ll be good to go.
For the tough jobs there’s the addition of baking soda. A bathroom can get a great cleaning adding baking soda to water, soap, and borax.
Baking soda and liquid soap should be mixed to a nice paste then add some water but not too much and you’re good.
For sprays you can use either water and vinegar which works great on glass and polished metal.
Home cleaning can mean green cleaning if you just stick to the basics and approach your regular cleaning the same way.
There are also tutorials on how to make more products for the home using products readily available in your cabinets or at the store. You can look for comingations that might work on other products eve outside like swimming pools, kids swing sets, bar-b-ques, even washing the walls of the house. All eco friendly with means you’ll be home cleaning and green cleaning in one stroke.
Tools can also be cleaned with these products and you might be surprised at how well it does. The home garage is a place that is a spotlight for home cleaning. A DIY solution can get that dust and grime out in no time.
It’s not a big thing to use these kinds of products and just a bit of study will get you started.
Now, in addition to the basics mentioned above, you can add essential oils to your mixtures and really see them pack a wallop. Tea tree oil is one of nature’s finest products. A little bit of tea tree oil with some warm water and liquid soap is a disinfectant that you just can’t beat. Smells good too.
Another great essential oil is peppermint. Not only does it smell good but it will both disinfectant. Lavender is another essential oil goodie. Head to a store that has these oils and ask around to see what can be applicable. They’re just as good a disinfectant as the stuff you buy in the stores.
Image credit: frannyanne
Posted in Bathroom Cleaning, Cleaning Service, Cleaning Tips, Green cleaning, Home Cleaning, House Cleaning, Kitchen
Comments Off on Cleaning The Home The Green DIY Way
Home Cleaning in Clearwater and St. Petersburg FL
Home Cleaning service by European Maids Cleaning company of St. Petersburg FL.
Home cleaning services have been provided by cleaning professionals in Clearwater, Palm Harbor and St. Petersburg Florida.
Our cleaning crew has done a great job cleaning one bedroom one bath condominium in Clearwater FL.


Posted in Bathroom Cleaning, Carpet Cleaning, Cleaning Service, Home Cleaning, Projects
Comments Off on Home Cleaning in Clearwater and St. Petersburg FL
Cleaning The Bedroom Big Time
The m ain problem with the bedroom is that it’s the bedroom. The place you lay your head down each night and sleep or lounge around on those lazy days. It serves as a combination crash pad, gymnasium and storage facility. With that much usage, cleaning it thoroughly means a big time effort.
We’re not talking your regular daily or weekly vacuuming and dusting, we’re talking the big beat down on dirt, clutter, damage, and more.
Getting started means surveying the bedroom and assessing when the last time it got a thorough cleaning. Realize that there may be spots that need some real elbow grease to straighten out. You’re going to have to move some furniture, loose some fixtures, and lift some rugs. The worst part is cleaning out the closets of clutter that has accumulated over time.
Clean out the closets and drawers first. Put down some plastic or big sheets that you can put the stuff on and not soil the rug or damage the furniture and floor. Look at what you really need to have in your closet. Old clothes that hold some sentimental value, just pack up and store in the attic. Shoes too. Some ladies can accumulate so many shoes they often forget they’re there. Tools, broken items, old boxes, need to be cleaned or tossed out. You’ll end up with just the right items you need to keep.
Before putting the necessary items back in the closet, inspect it for damage. Clean it thoroughly and if it needs painting or repair, set that as a chore. Once the job is done you can repopulate it with your possessions. Drawers, cabinets, need to be inspected and cleaned. Move them to see what is underneath them and clean it if need be. Check ceiling fans and air ducts for dust and clutter as well as discoloration and damage. Replace them to give the place a better look. Furniture and items that have small details you need to clean with delicate cloth and cleaner.
If the room needs a new coat of paint, then set things up. Same if the rug or flooring needs attention. A new rug will prevent the build up of mold and dust that older rugs can accumulate. Smooth surface flooring like hard wood, need special care and a few throw rugs that are secured underneath with adhesive will protect the floor and cut down on noise. Don’t forget door hinges and door knobs as well as electrical sockets. Just unscrew and replace or unscrew and clean and put back.
Overall, home cleaning with the bedroom will lead to more peace of mind and foster a better attitude in your life.
Image source: Andriy Popov
Posted in Cleaning Service, Cleaning Tips, Home Cleaning, House Cleaning
Comments Off on Cleaning The Bedroom Big Time
Cleaning The Pro Way With Simple Household Items
 It might surprise one to find out that they can do a pro level job of cleaning the bathroom and kitchen using just some simple products that are found in just about every household.
You don’t need those high profile cleaning products that cost a bit and don’t always do the job. Doing things the old fashioned way can save in money, time, and get the level of cleaning done that doesn’t harm surfaces, gets rid of the germs with basic vinegar. Vinegar is one of the oldest and most effective disinfectants and cleaners ever. So much so that some companies actually up out a product called cleaning vinegar, which is basically vinegar with a new snazzy name.
Usually, just a half cup of vinegar and a half cup of water will do an entire bathroom or kitchen. This includes appliances, sinks, walls, and floors, and doors tool.
Vinegar won’t harm anything and kills odors. The trick is to get a regimen in and the right tools which are simple. Nowadays the only difference is that you can use microfiber cloth thus cutting down on the use of numerous paper towels.
For the sinks and toilets and showers, just spray the cleaning solution and let set for like 15 minutes. Then follow up with a damp cloth from top to bottom. Follow up with a buffing of paper towels or toilet paper. You’ll get that professional shine right on the spot. Toilets are the heavy duty job, but following a simple procedure will get the job done almost effortlessly. You spray the inside of the bowl and scrub before spraying and wait until 15 minutes after spraying. The grime and icky will disappear easily. Next spray the outside of the toilet and seat and lid and let set about 10 minutes and use a cloth the same way and buff with paper towels or toilet paper. It’s easy and highly effective. Not a lot of elbow grease needed at all.
Walls are the same way. Spray, wait, damp cloth. For appliances, same thing except for the insides. Refrigerators need cleaning in a different way as do dishwashers and microwaves. Fridges need to be sprayed and with the door open, let the spray sit and then wipe down and do a thorough job on the shelves. Put the shelves back in, let dry and you’re good to go. Same with a microwave. Open the door, spray lightly, let set, damp cloth, buff with paper. Dishwasher cleaning can be done with no effort. Just a half cup of water and half cup of vinegar poured into the dishwasher and set on low cycle and voila, the job is done. Do this once a week to prevent odors and other nasty things.
Finally, for floors, you just get a damp mop, after thoroughly spraying the floor or just applying directly with your vinegar water solution. When it’s almost dry, clean damp mop with warm water, to clean up and you’re done.
So it’s no big major chore, just doing things simply with cleaning tools and products that are inexpensive and easy to get.
Image credit: Sebastian Duda
Posted in Cleaning Products, Cleaning Service, Green cleaning, Home Cleaning, House Cleaning
Comments Off on Cleaning The Pro Way With Simple Household Items
European Maids Cleaning Condominium in St. Petersburg FL
Condominium cleaning service by European Maids Cleaning company in St. Petersburg.
Home cleaning service by professional cleaning company in Palm Harbor, Clearwater and St. Petersburg.


Posted in Cleaning Service, Condominium Cleaning, St. Petersburg
Comments Off on European Maids Cleaning Condominium in St. Petersburg FL
Condominium Cleaning in St. Petersburg Florida
Cleaning service by European Maids Cleaning company of St. Petersburg FL.
Home cleaning service is always provided by a professional in Clearwater, Palm Harbor and St. Petersburg FLorida.

Before the cleaning

After the cleaning
Posted in Cleaning Service, Condominium Cleaning, Home Cleaning, Residential Cleaning, St. Petersburg
Tagged St Petersburg
Comments Off on Condominium Cleaning in St. Petersburg Florida
Cleaning The Refrigerator Doesn’t Have To Be A Chore
 The refrigerator is the second busiest if not the most busy large appliance in your house. It runs 24/7 and is essential in the preservation of your food. It can take some punishment and requires regular cleaning, but it doesn’t have to be a chore.
Cleaning the refrigerator means you’ll have it operating at top efficiency. This means that when clean, it will use less electricity and deliver proper performance.
First comes the cleaning and checking. Look for leaks along the seal by putting a flashlight or some portable light inside and close the door. Turn off the lights and examine to see if you see light emitting from the fridge. If so, you need to tighten up that seal. This will keep food fresh and odors down.
Next is cleaning. You can use a number of homemade cleaning solutions or a brand name one from the store. Get one or make one that not only cuts through grease and grime, but also disinfects and won’t harm the surfaces of the refrigerator itself. You can then buff some wax on the glass to prevent stains and such, but your main goal is to get rid of grease and grime, disinfect and then prevent same.
There are also a number of ways to deodorize your fridge too. The old standby is a box of baking soda opened and sitting in the back of the fridge. Another is using a sock with activated charcoal that you can get at any pet store. Put it in the sock, tie a knot in it and stash it out of the way in the fridge. That will absorb the odors for at least a month or more. Some cotton with vanilla extract, orange oil, lemon oil, or something like that, will add some pleasant aroma to the fridge.
There are lots of household remedies so it’s best to search around and ask friends and family what they use.
Once you’ve gotten the refrigerator cleaned, cleaning it over time will be easier. There are other things you an do to aid in your refrigerator cleaning regimen.
Keep items at least an inch away from the walls of the refrigerator. This will allow for the fridge to circulate the air and keep things cool. Keep all containers with lids and tops tightly closed. Avoid putting meats on top but keep them on the bottom as if they leak you won’t have a waterfall of stuff. Vegetables should be in their own bin, best on top of a plain paper bag or paper towels that will absorb moisture and odors.
Cleaning your refrigerator should be a pleasurable experience, not a chore.
Image credit: Andriy Popov
Posted in Cleaning Service, Cleaning Tips
Comments Off on Cleaning The Refrigerator Doesn’t Have To Be A Chore
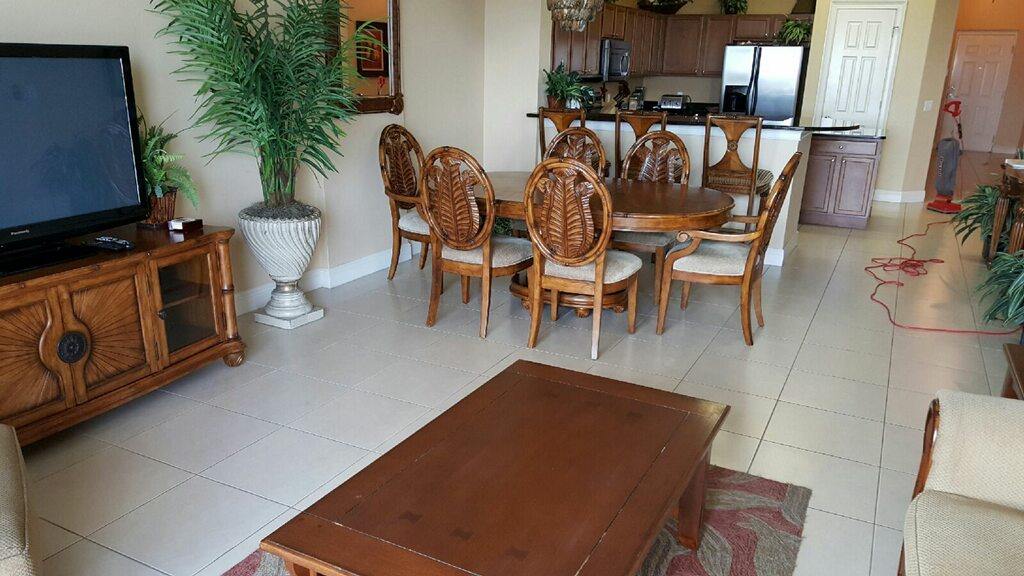
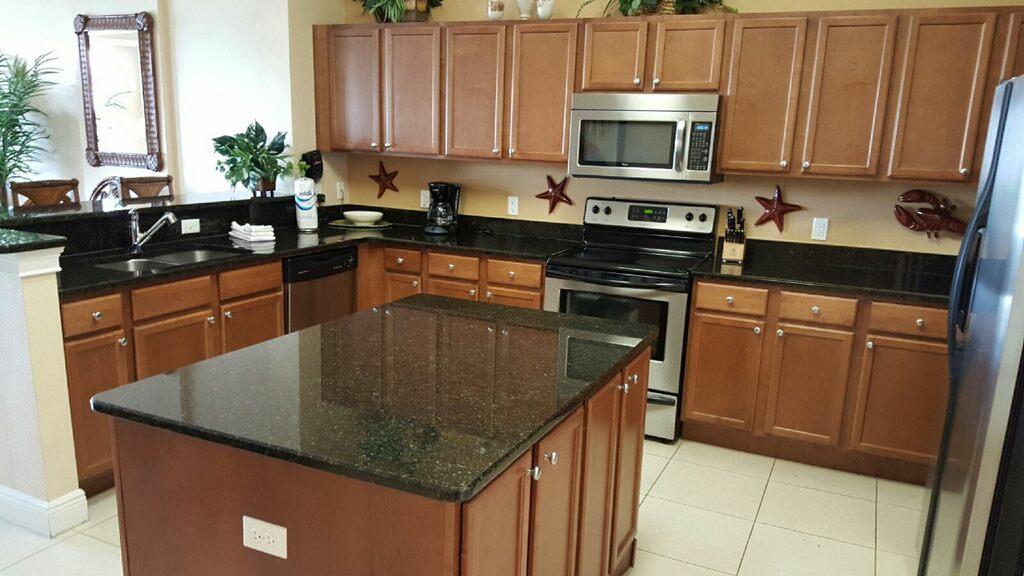
Condominium Cleaning in St Petersburg FL
New photos from European Maids cleaning crew.
St. Petersburg beach 2 bedroom/2 bath condominium cleaning was done to our customer satisfaction.


Posted in Cleaning Service, Condominium Cleaning, Home Cleaning
Comments Off on Condominium Cleaning in St Petersburg FL